 Halloween is such a fun time! Costumes, candy, and of course the festive decor... Halloween decorations can be found all over these days, but why pay when you can make them yourself with items you probably already have on hand? I'll share 3 different decorating ideas you can make no matter your crafting skill level, in no time flat, for under $10!
Festive paper bunting
This is an oldie but goody... paper bunting isn't just for baby showers or backyard birthday parties. And if you do any paper crafts, you likely have everything you need to make this one! If not, you can still make it... just gather the following:
Card stock
Twine or yarn (about 9 feet)
rubber stamps or clip art
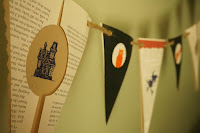
Start with a flag shape; I like the traditional triangle. Cut out as many as you like, at whatever size you like, for the length of banner you want to create. Mine uses a 6 inch wide/9 inch long triangle. In addition to colored cardstock, I used pages from an old damaged book I found. These pages made the perfect back drop for my favorite Halloween stamps. If you don't have stamps, simply find clip art you like and trace or print onto the paper you want to use. Lastly, just punch a few holes in the top of each flag, and string them up!
Felt ghost garland
These are simple and can be strung together in a garland, or used individually as ornaments! Each ghost uses:
one 5 inch square of felt
a cotton ball or a little bit of fiberfil (really anything will work here, even fabric scraps)
needle and thread (both white and black embroidery thread)
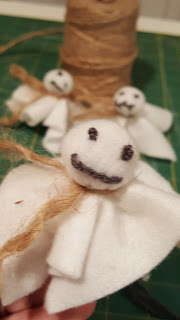
Start by placing the center of the felt square over the end of your finger; mark where you want the face of the ghost, and where the neck line should go, with a fine tip felt pen. Next, with the black thread, embroider the face... the simpler the better! This can also be done with fabric paint or pens if you are not ready to try out embroidery. Then, stitch a running stitch around the neckline with your white thread. Pull the thread to close up the neck partially, then stuff the head, and pull the neck closed tightly. Secure the neck thread and trim any remaining threads. Lastly, you can string these guys together with twine, ribbon, or yarn... so cute!
Glowing spooky lanterns
I saved the best for last! This is one of my favorites... Glow in the dark paint is so much fun, and what better time to give it a try than Halloween? For this project, you will need:
Glow in the dark paint (spray paint works best, and ranges from $5-$10 depending where you shop)
Ornaments (simple globes work great)
Black permanent marker
I like to either string up my ornaments to paint them, or if you have small bamboo skewers you can stick them in the ground and pop the ornaments on them upside-down. Either way it's best if you can spray all sides at once. I used Krylon glow in the dark spray paint despite the poor reviews (just giving it a try...) and I think it worked really well! I did not prime the plastic dollar store ornaments, but I did uses about 3 coats of the glow in the dark spray paint. Next I simply used a marker to draw on the cute faces... of course you can add anything here, even glue on plastic spiders if you don't want to draw! Hang in a well lit area during the day, and watch them glow at night ;D
What are you making this year? Feel free to post your handmade Halloween items here! Looking for other holiday ideas? Well you're in luck; just keep an eye out for more decorating ideas from me through the fall and winter. And of course you can always check out my etsy shop for even more vintage and handmade items for the home! See you next time ;D
OK, that's all for now; on to the next project! Want to know what it is? Follow me on twitter for sneak peeks and updates! If you're just looking for DIY inspiration, stayed tuned @ dawntoussaint.com for more on my DIY projects through the year! If you're looking to get some of the items you've seen here, on twitter, or on my boards, check out my etsy shop!


No comments:
Post a Comment