There are a number of thrift shops in my area that carry an amazing assortment of items, including furniture. So when I need an idea, or a little inspiration, I just head over to the shop to see what's new! I'm not usually disappointed, but this time I came across one of the most unusual pieces I had seen in a while... Blue velvet, caning on the wing and arms, mid century art deco details, biscuit tufting... so as you can imagine, I had to have it!
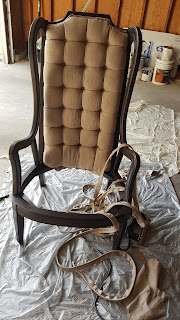
The first thing that had to go was the blue velvet, but the caning was a close second! With the seat removed, and the back stripped down to the frame, it's time to get the knife out... The caning was easy to cut because it had been glued into a grove in the frame, so running a sharp knife along that track was all it took. A quick sanding and this chair is ready for paint!
Now for the upholstery! Of course, one of the things that drew me to this chair in the first place was the tufting... but before I could get to that, I had some prep to do. On the original chair the tufts are held in place by these .5" fabric covered buttons (27 of them to be exact). So before anything else, I'll have to make those using a button kit that can be found at most craft or sewing suppliers. Next is the piping, double piping in this case, that will trim both the inner frame(where the caning used to be) and the back of the chair. I need about 8 yards, sew time to get out the sewing machine! Piping can be made using a zipper foot, but if you have to make a lot of it, I really recommend getting a piping foot (sometimes called a welting foot). This way it's so easy you can even enlist someone else to do it (even if they don't know how to sew, it's that easy!).
OK, with all that out of the way, we can get to the good stuff! Tufting is part technique and part art... like upholstery in general. If you are tufting for the first time, I do recommend doing a project like this, where you can leverage the cushion and frame that was already prepared for this technique. I also recommend getting the right tools: Upholstery thread, and an upholstery needle. You can make it work without them, but be prepared for frustration, broken threads, and sore finger tips!
I'll start the tufting by placing a layer of batting over the foam (remember this foam has already been scored and the holes drilled). Using a bone tool, I'll push the batting down into the holes where the buttons will go. Next I'll place the fabric over the batting, pushing it into the tufting holes the same way. Once I like the way it looks, I will begin threading the buttons. It will take a few attempts to get the tufting to the right depth, so the first round I'll secure them loosely; coming back around to tighten and permanently secure later. On the seat I'll secure the threaded buttons to the springs, but on the back they are secured to a strong piece of particle board or thick pressed card board with holes punched in it.
With tufting complete, It's time to pull this chair back together! The seat just needs a clean crisp panel across the front and sides to finish it off. That will be set aside and re-attached to the chair frame last. The seat back needs to be re-attached next. The top gets nailed about an inch from the edge of the wood, following the shape of the frame. The sides are pulled through to the back and secured. Lastly, the back is covered from the top of the frame, pulling down and securing to the under side of the seat bottom. Trim all the rough edges, we'll cover those up in our final phase: adding the double piping trim!
The home stretch. Adding the piping is all we have left to do... but that might sound easier than it is! To make this process easier, you could try using hot glue to attach the piping all around the frame. That way you can use both hands to measure and add your decorative nails. For this I'm using .5 inch steel upholstery tacks because they are affordable and I love the look! I placed them 1 inch apart, measuring along the way and making sure that both right and left side were symmetrical! Turn the chair around and do the same on the back... All done ;D
This chair was so much fun to make, super comfortable, and looks great in house! And coming in at under 3 days work and $70 to complete, what more could I ask for? Well, I'd love to hear what you think!
OK, that's all for now; on to the next project! Want to know what it is? Follow me on twitter for sneak peeks and updates! If you're just looking for DIY inspiration, stayed tuned @ dawntoussaint.com for more on my DIY projects through the year! If you're looking to get some of the items you've seen here, on twitter, or on my boards, check out my etsy shop!


No comments:
Post a Comment