You know what we have to do! Let's take a look at the before. This frame was practically free... which is a good thing, because I had to purchase a few additional items for this transformation to be complete: Brass finish corner brackets, leather scraps, flat pins, chalkboard paint, creme wax, and a small piece of particle board. A few tools are necessary as well: power drill, screw driver, flat pin driver, and painting supplies.
The frame itself needs a good cleaning with an old toothbrush to get into all those little grooves in the wood. Once dry, a coat of creme wax is applied with a stiff brush (again, to get into all the grooves).
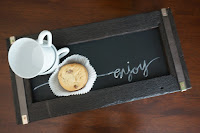
The last step is to add a personalized message... this is a chalk board after all!Since I'll be placing mine on the table, I'm going to add a simple friendly "enjoy" in a handwritten script. With a piece of chalk, I'll lightly rough in the word for placement. I'll then get out the guache (which is basically liquid chalk) and a fine brush to paint in the final version. I say final, but this paint erases just like chalk... for a more permanent version, I suggest using acrylic paint. Throw a couple felt feet, or cork bits on the bottom to protect the table surface and voila! What do you think?
That's it; on to the next project! Want to know what it is? Follow me on twitter for sneak peeks and updates! If you're just looking for inspiration, stayed tuned @ dawntoussaint.com for more on my projects through the summer! If you're looking to get some of the items you've seen here, on twitter, or on my boards, check out my etsy shop!


No comments:
Post a Comment